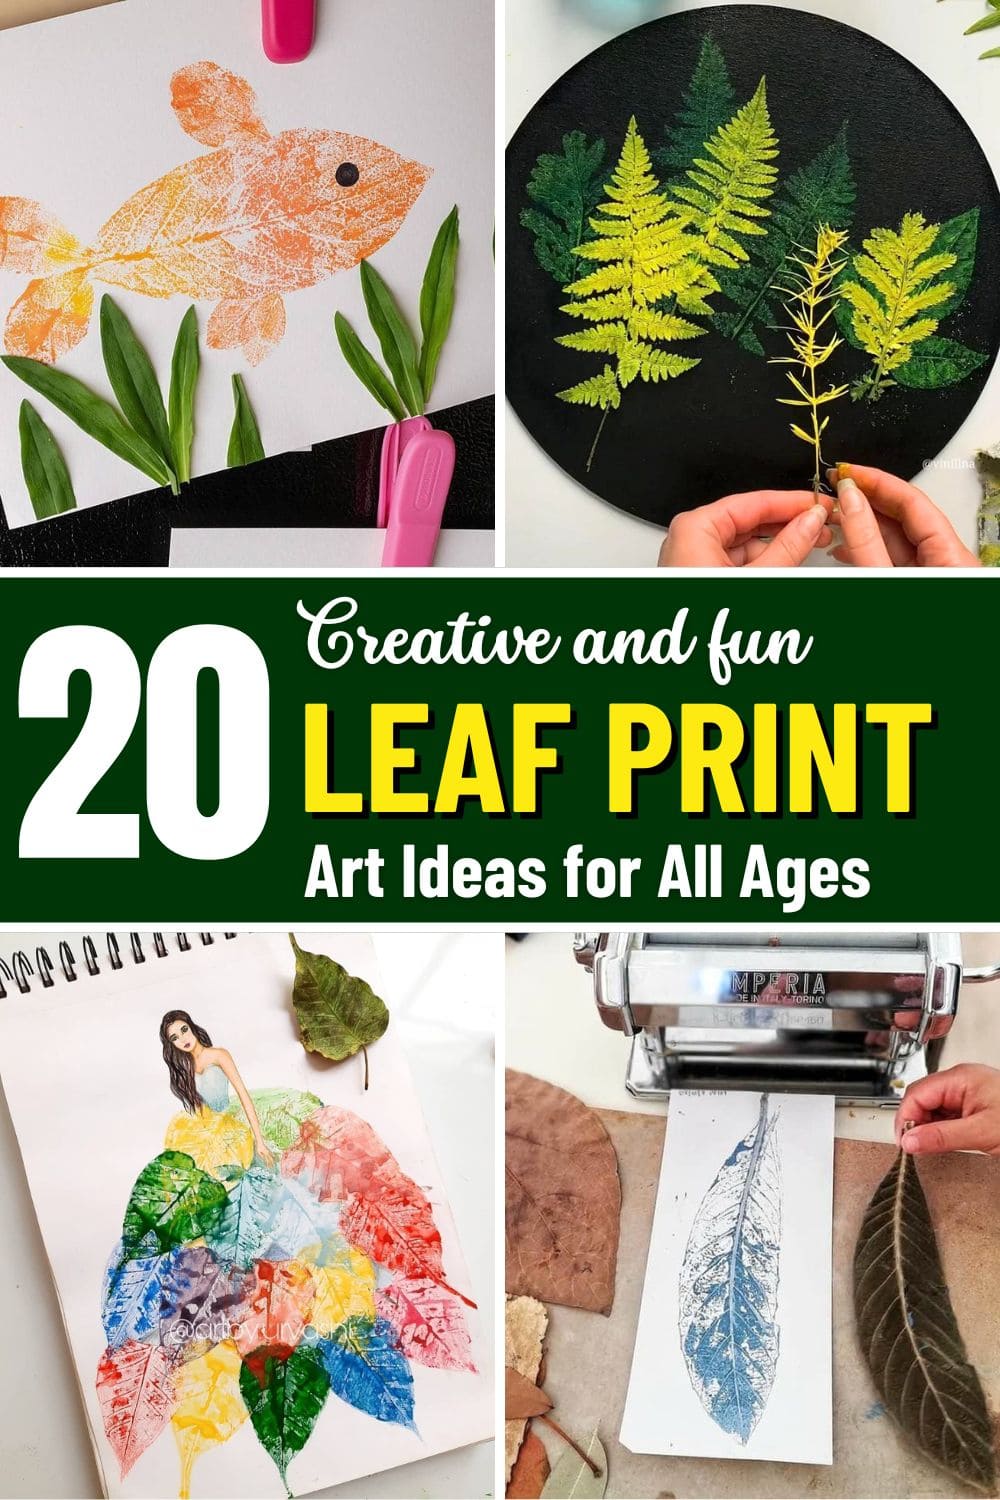
There’s something magical about pressing a leaf onto paper and watching its delicate veins and shapes come alive in color.
I still remember doing this as a kid, fingers stained with paint, my eyes wide with wonder as nature left its mark like a hidden signature. Leaf printing is one of those simple joys that never really gets old.
Of course, it’s creative, calming, and somehow deeply personal. You’re not just making art, you’re preserving a fleeting moment of the season.
In this collection, you’ll find 20 leaf printing art ideas that bring out the beauty in every leaf, and maybe, spark something nostalgic, playful, or totally fresh in your next creative adventure.
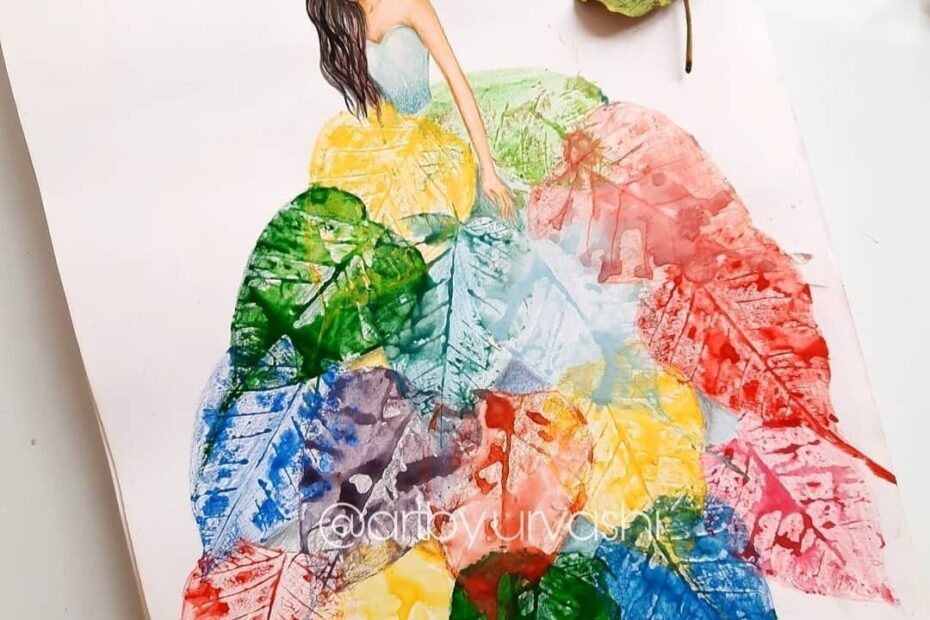
#1. Rainbow Leaf Print Ball Gown
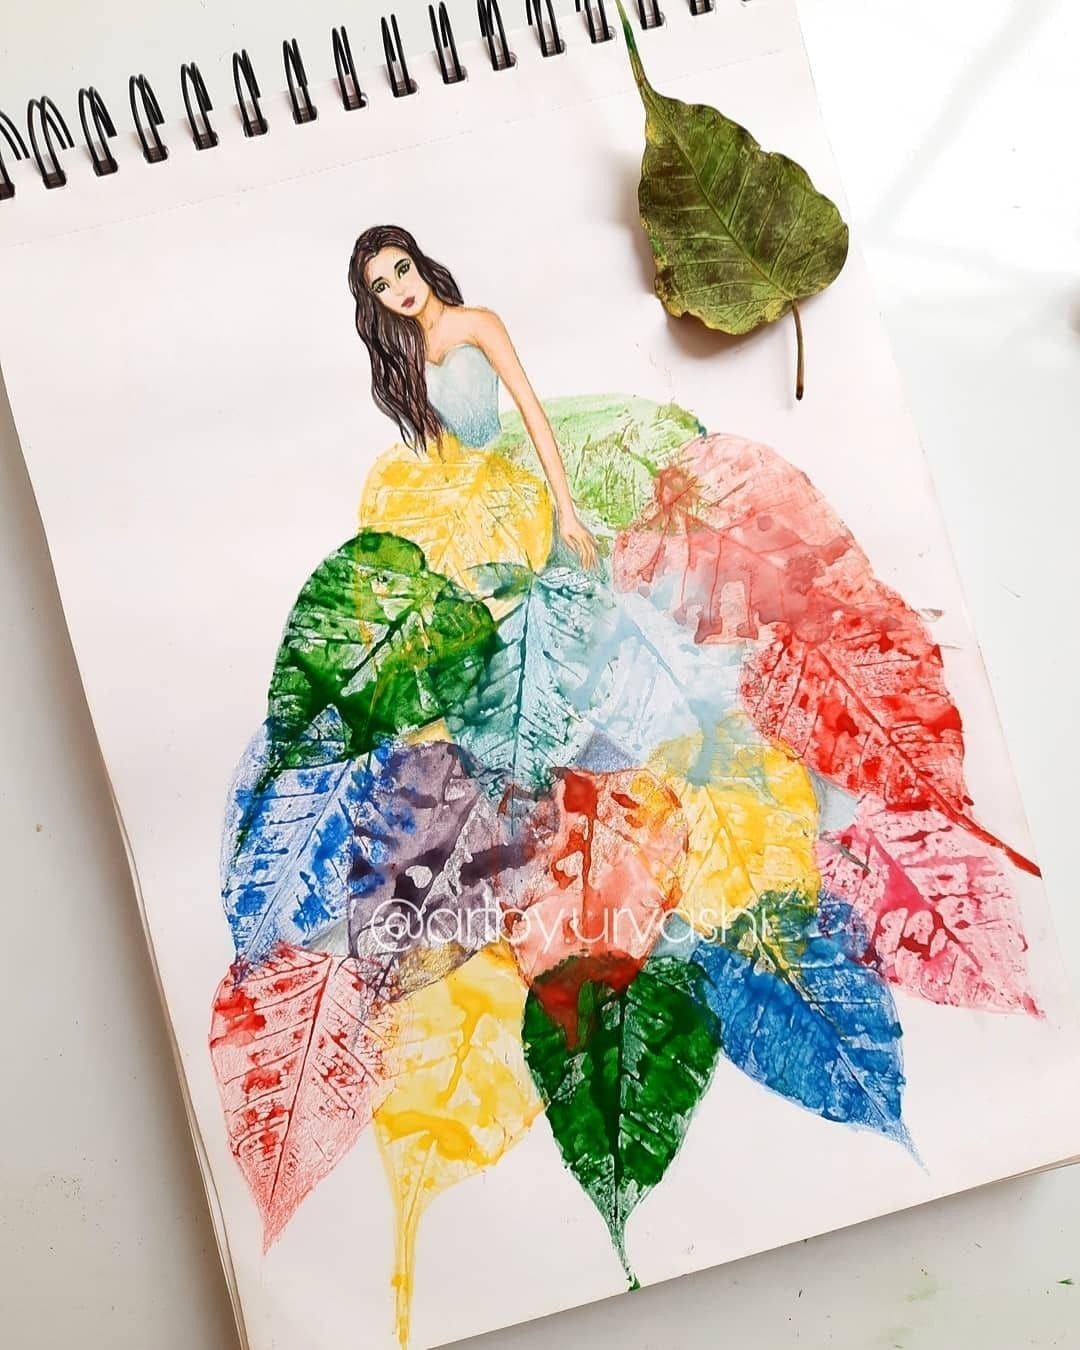
This breathtaking design transforms nature into fashion with a vibrant leaf-printed dress that looks straight off a fairy tale runway.
You can use real leaves dipped in bold paints like red, blue, yellow, green, purple and arrange them like cascading layers of a voluminous gown beneath a sketched figure.
Each imprint adds depth and texture, creating a stunning blend of elegance and whimsy. The mix of leaf shapes and colors makes the whole piece feel alive, like she’s about to twirl into a dream.
Materials Needed
- 10-12 skeleton or soft broad leaves (4-6″ each)
- Acrylic paints in assorted rainbow colors
- Paintbrush or sponge
- Mixed media or sketchpad paper
- Black pen or fine liner
Step-by-step Guide
Step 1: Lightly sketch the top half of a figure, you should focus on the upper body, face, and arms. Then leave the lower part blank for the dress.
Step 2: Coat the backs of your leaves in different paint colors. Next, gently press them in a layered arc below the torso, fanning them out like a gown.
Step 3: Once dry, outline details of the figure, touch up facial features, and admire the magical transformation of leaves into couture.
#2. Leaf Print Butterfly in Watercolor Style
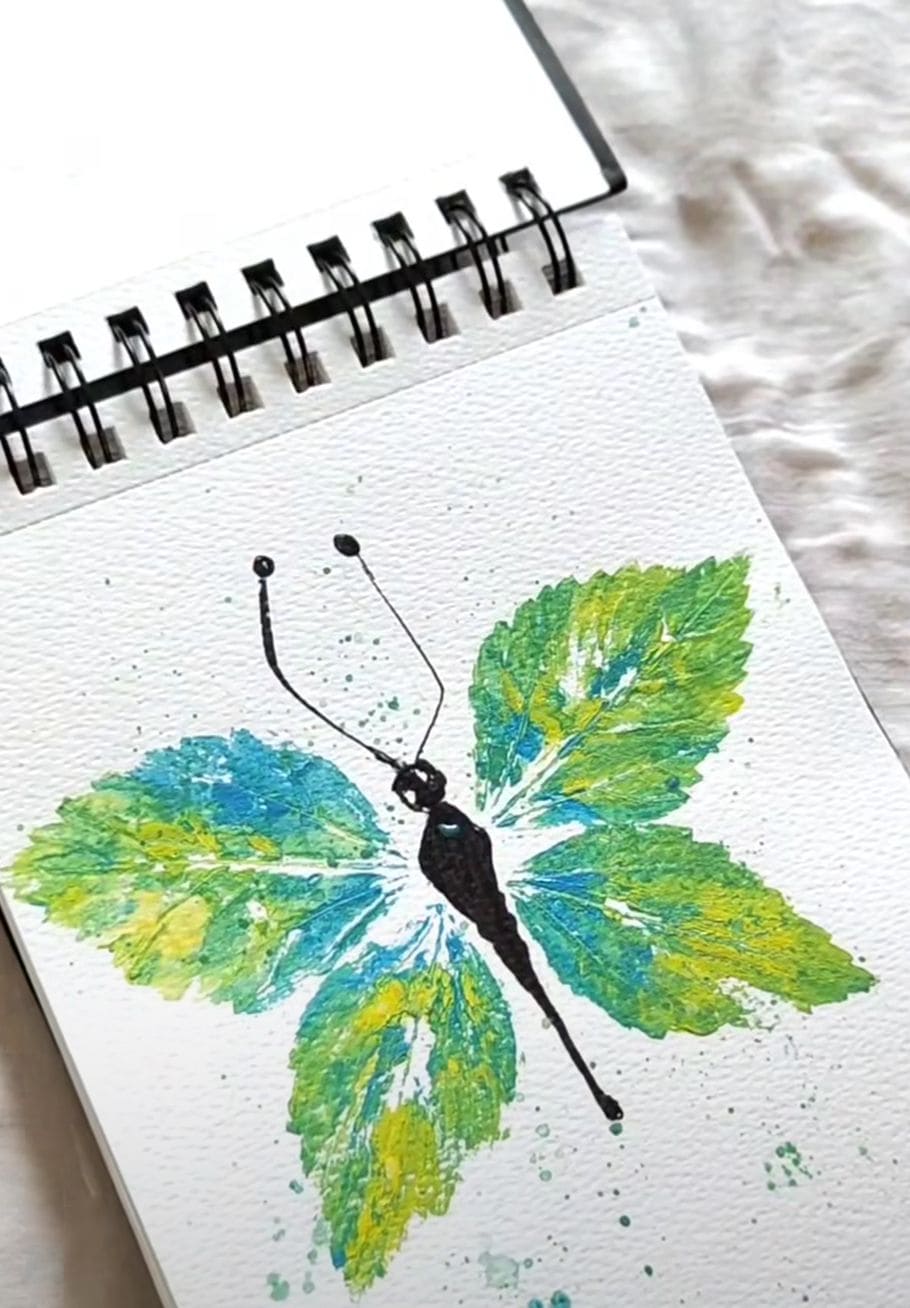
Amazingly, this delicate butterfly looks like it fluttered straight out of a watercolor dream.
Created by pressing painted leaves onto textured sketchbook paper, the wings glow with vibrant blends of turquoise, lime, and sunshine yellow.
Specially, the black inked body and antennae anchor the design, giving it the elegance of a storybook illustration. It’s a gentle and expressive craft perfect for journaling, wall art, or simply enjoying an afternoon of mindful creativity.
Materials Needed
- 4 small oval leaves (each around 2.5-3″ long)
- Watercolor paints in blue, green, and yellow
- Textured paper or watercolor pad (5″x7″ or larger)
- Fine-tip black marker or brush pen
- Soft sponge or small paintbrush
Step-by-step Guide
Step 1: Paint the back (veined side) of each leaf using your watercolor palette. Then apply the colors softly and let them blend slightly for a dreamy gradient.
Step 2: Press the painted leaves gently onto the paper in a butterfly wing formation, two on each side angled outward.
Step 3: Once dry, draw a slender butterfly body between the wings and add two curved antennae with little dots at the ends for a whimsical touch.
#3. Pressed Leaf Art with a Pasta Machine
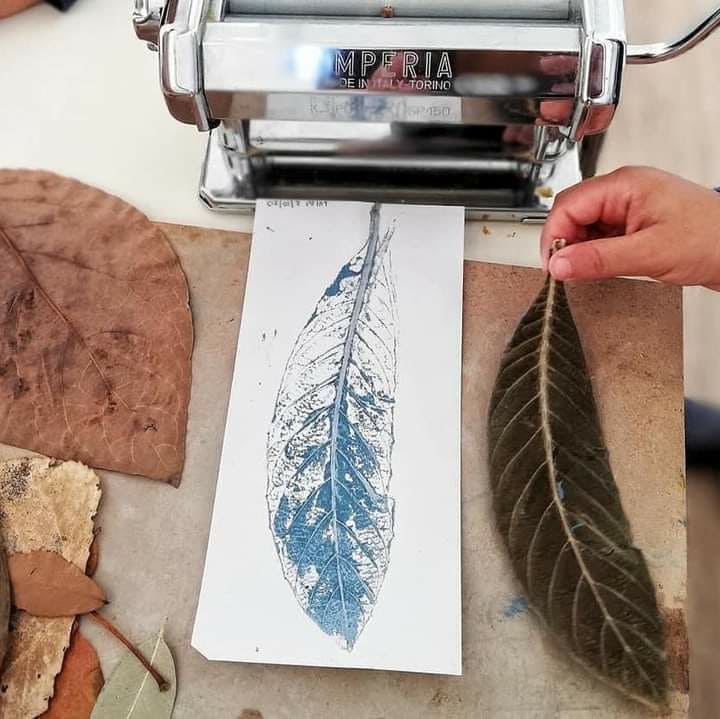
Who would’ve thought a pasta machine could create such poetic impressions? This creative twist on leaf printing lets you roll nature’s texture right onto paper, revealing each intricate vein like a botanical fossil.
It’s simple, tactile, and incredibly satisfying, especially when you see the print emerge from the roller like a quiet secret nature’s been keeping.
Materials Needed
- 1 pasta machine (manual roller type)
- 3-5 medium-sized leaves (4″-7″ long, freshly picked and pliable)
- Acrylic paint or block printing ink
- Small sponge or brayer
- Thick paper or cardstock (4″×8″ strips work well)
- Paper towels
Step-by-step Guide
Step 1: Choose a leaf with prominent veins and soft texture. Then wash gently and pat dry to remove any debris.
Step 2: Using a sponge or brayer, apply a thin, even coat of paint to the veined side of the leaf. Too much paint can cause smudging.
Step 3: Place the leaf paint-side down on the paper. Then carefully sandwich both between a folded sheet or thin protective backing to prevent slipping.
Step 4: Run this paper-leaf combo slowly through the pasta roller. You should use firm, even pressure and guide it gently so it doesn’t crumple.
Step 5: Finally, peel the leaf back gently to reveal a crisp, organic print that’s full of detail and elegance.
#4. Monochrome Leaf Burst Wall Art
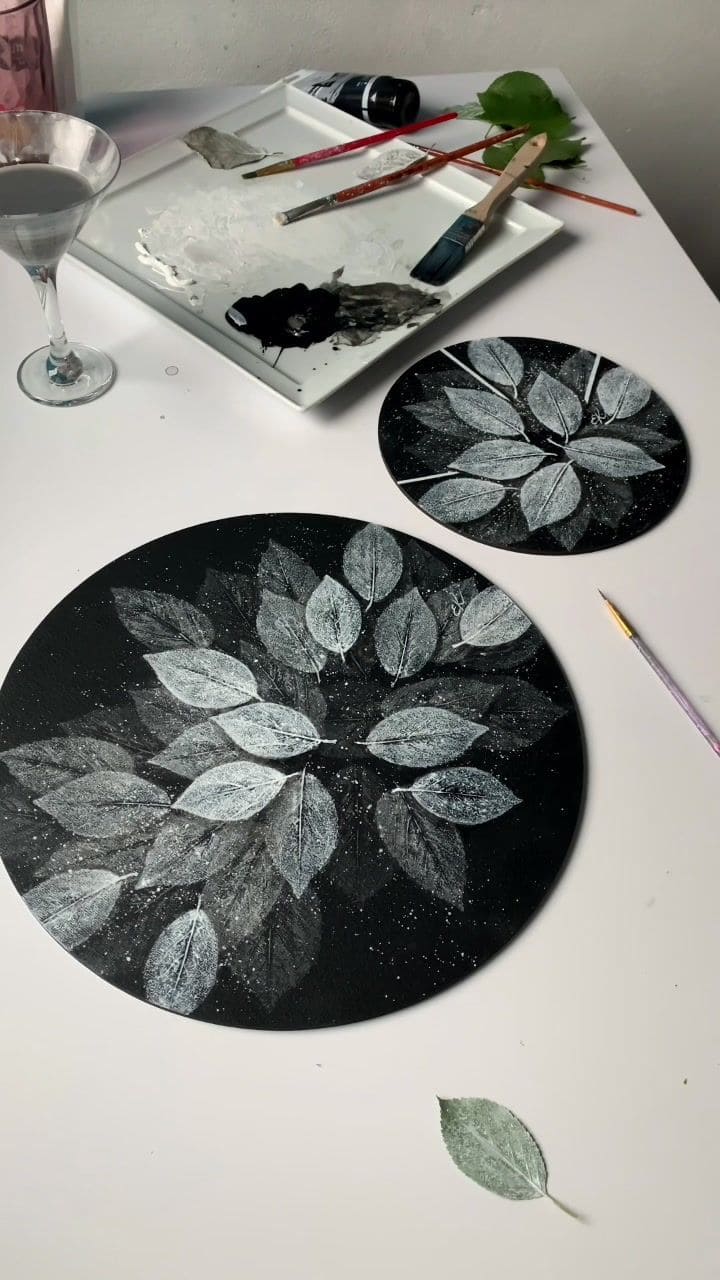
This stunning piece gives off lunar energy with its high-contrast black background and soft white leaf prints that radiate outward like a cosmic flower.
Also, the layered look is created by overlapping real leaves dipped in various shades of white, grey, and ash. The delicate speckles around the composition add a starry, celestial touch like mist floating over a moonlit forest.
It’s minimalist, elegant, and easy to recreate, making it a favorite for modern decor lovers or anyone drawn to nature-inspired neutral palettes.
Materials Needed
- Round black canvas boards (12″ and 8″)
- Fresh leaves (approx. 10-12 medium size)
- White, grey, and black acrylic paints (50 ml each)
- Flat paintbrush (1 inch) and detail brush (#1)
- Toothbrush or stiff bristle brush
Step-by-step Guide
Step 1: Coat your leaves lightly in white paint using a brush. Then press them onto the black canvas in a circular formation, radiating from the center outward.
Step 2: Once the first layer dries, repeat with a slightly darker or lighter shade to add depth. You can vary position and pressure for texture.
Step 3: Dip a stiff brush in watered-down white paint and flick speckles over the design to finish it with a soft, star-dust effect.
#5. Crayon-Resist Leaf Prints with Watercolor

This vibrant crayon-resist technique is one of those joyful little experiments that never gets old, especially when you’re crafting with kids or simply craving a burst of color.
The magic happens as the wax repels the watercolor, revealing crisp leaf shapes that look like they were plucked right from a storybook forest. You’ll love how easy and forgiving this project is.
Even if your lines are wobbly or your paint pools unexpectedly, the final effect always feels a bit enchanted.
Materials Needed
- Thick white cardstock or watercolor paper (4″×6″ pieces)
- White crayon or oil pastel
- Watercolor paint in assorted shades
- Small to medium brush (round tip, size 4–6)
- Water container and paper towel
- Real leaves
Step-by-step Guide
Step 1: Lightly sketch or trace a leaf design onto your paper using pencil. Then, draw over the lines with a white crayon, pressing firmly so the wax fully coats the paper.
Step 2: Choose a color palette and begin painting over the entire paper with watercolor. You watch as your leaf begins to appear through the resist, it’s always a little surprise!
Step 3: Let the paint dry completely. You can go over some areas with a second color for depth, but don’t overwork the surface or it may muddy.
Tip: For a more dramatic effect, you can also use darker watercolor shades like cobalt or crimson to contrast with the white lines.
#6. Fern Leaf Stencil Wall Art
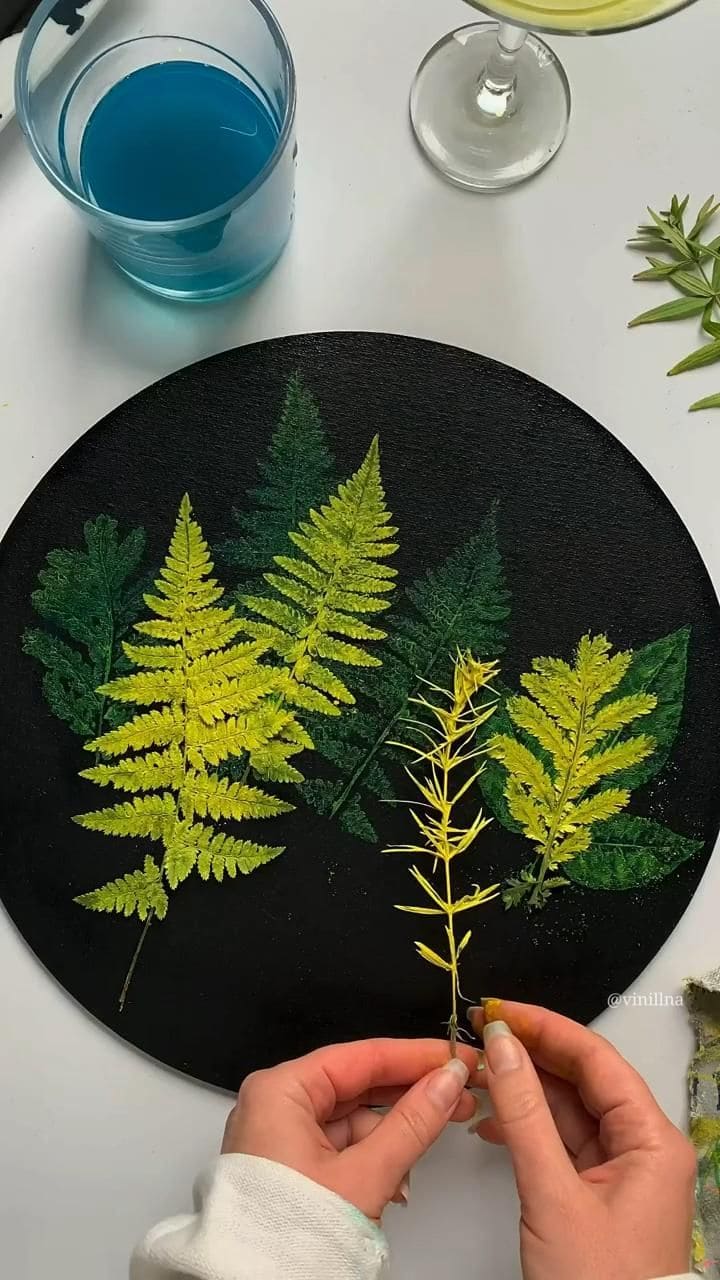
You can see this eye-catching botanical art uses real fern leaves and vibrant paint to create a lush forest effect on a deep black canvas.
Each leaf is painted and pressed to form a perfect imprint, giving it a natural yet stylized texture. The contrast between bright yellow-green hues and the moody background makes the details pop like sunlight through a dense canopy.
Plus, the circular shape adds elegance and balance, ideal for modern home decor or a handmade gift.
Materials Needed
- Round black canvas (10-12” diameter)
- 5-7 fern leaves and similar foliage
- Acrylic paints (lime green, yellow, forest green)
- Flat paintbrush or sponge
- Paper towel and tweezers
Step-by-step Guide
Step 1: Choose fern leaves of different sizes and gently clean the back surface (vein side) for best results.
Step 2: Paint the backside of each leaf with your chosen colors, then press onto the black canvas firmly.
Step 3: Slowly lift the leaf to reveal the print, layering more around it for a full composition. Now, you just allow to dry before sealing or framing.
#7. Leaf Print Turkey Art for Kids
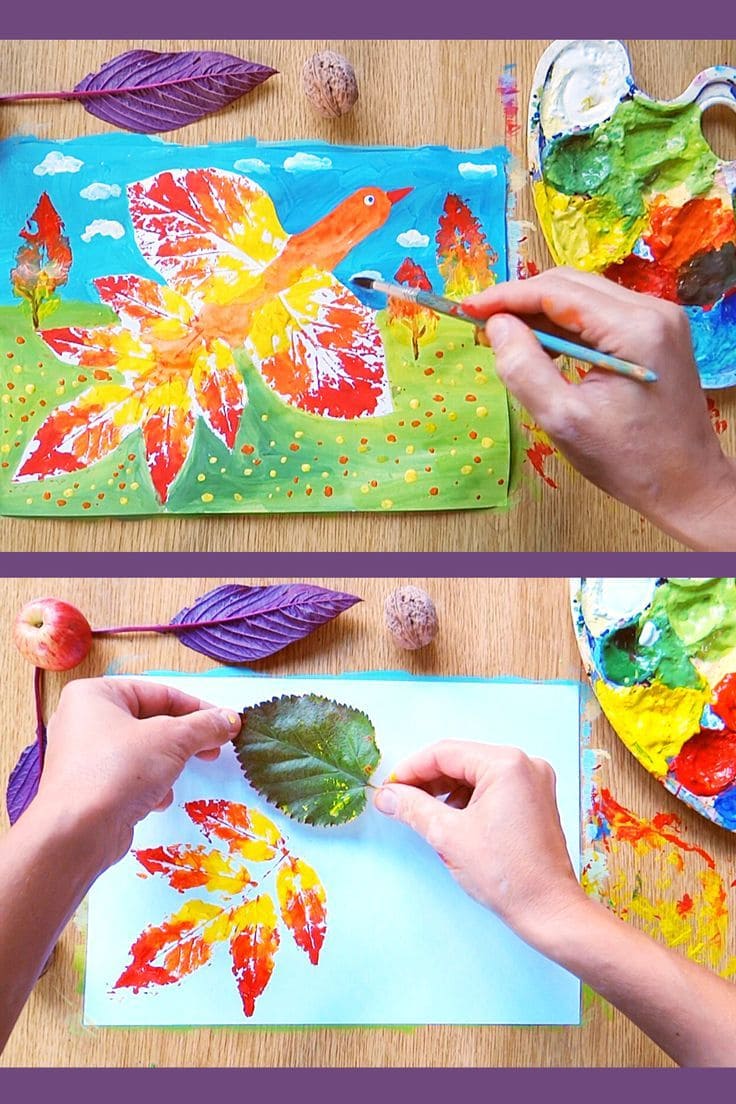
Using real leaves as stamps, kids can build vibrant tail feathers in fiery reds, oranges, and yellows.
Once the leafy tail is done, they finish the artwork by painting a simple turkey body on top, surrounded by a happy fall landscape. It’s perfect for Thanksgiving crafts, homeschool art sessions, or just a sunny afternoon of leaf play.
Materials Needed
- 6-8 mixed leaves (medium size)
- Thick paper or watercolor paper (A4)
- Acrylic or tempera paints: red, yellow, orange, green, blue
- Paint palette and brushes (flat and round)
- Paper towel and apron (optional)
Step-by-step Guide
Step 1: Brush fall-colored paint onto the back side of each leaf. Then press them firmly onto the paper in a semi-circle to form the turkey’s tail.
Step 2: Let the prints dry, then paint the turkey’s head and body in the center using brown and orange tones.
Step 3: Add a beak, eye, and any scenery you like such as grass, trees, or sky. Let your imagination run wild!
#8. Leaf Print Painted Rocks

These painted leaf print rocks are like little nature treasures you can hold in your hand. Each smooth stone becomes a vibrant canvas, displaying a fern or foliage silhouette in earthy greens against colorful backgrounds.
Moreover, it’s the perfect blend of art and nature, great for kids’ crafts, garden decorations, or even gifts. You get texture, color, and creativity all in one sweet, tactile piece.
Materials Needed
- Smooth flat rocks (medium size, 3-4 inches)
- Acrylic paints in bright and earth-tone colors
- Fresh leaves or ferns with clear vein patterns
- Paintbrushes and sponges
- Mod Podge or clear sealant (optional)
Step-by-step Guide
Step 1: Paint each rock in your chosen background color and let dry.
Step 2: Paint the underside of a leaf with green paint and gently press it onto the rock’s surface.
Step 3: Carefully lift the leaf to reveal the print. Then touch up if needed with a fine brush.
Step 4: Once dry, apply a sealant to protect the artwork if you’ll place them outdoors.
#9. Fall Handprint Leaf Keepsakes
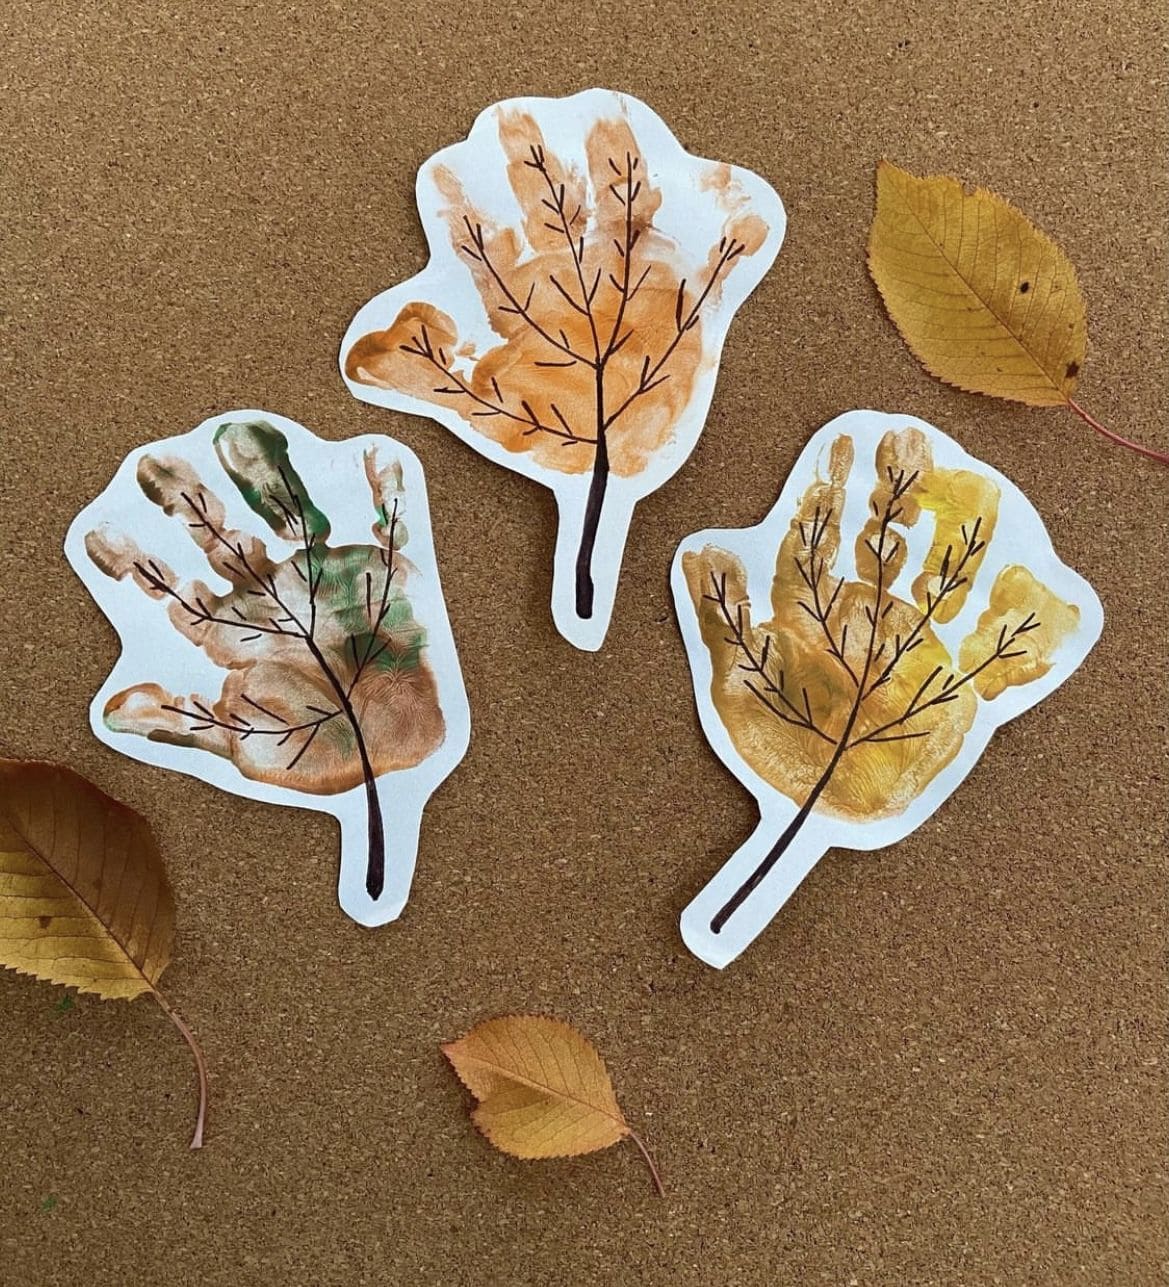
Why not turn your child’s handprint into a whimsical autumn leaf with this adorable craft? It’s part memory, part artwork and entirely heartwarming.
The painted hand becomes a vibrant leaf, and with just a few drawn lines, it transforms into a leafy branch dancing in fall’s golden breeze.
Bonus, these look lovely pinned to a cork board, added to greeting cards, or hung on the fridge to cherish tiny hands that won’t stay tiny for long.
Materials Needed
- White cardstock or watercolor paper (8.5″×11″)
- Washable tempera paint in fall tones (yellow, brown, orange, green)
- Paintbrush or sponge
- Black fine-tip marker or pen
- Scissors
- Glue or adhesive (if mounting)
Step-by-step Guide
Step 1: Use a brush or sponge to apply paint to your child’s palm. You can mix fall shades to add depth as no need to be neat!
Step 2: Press the painted hand firmly onto the cardstock, then lift straight up. Let it dry completely.
Step 3: Using a black pen or marker, draw a simple tree branch along the palm, with offshoots tracing through each finger. This gives the look of veins or branches on a fall leaf.
Step 4: Cut out the handprint shape, leaving a small border around the edge.
#10. Pink Butterfly Leaf Print With Twig Body
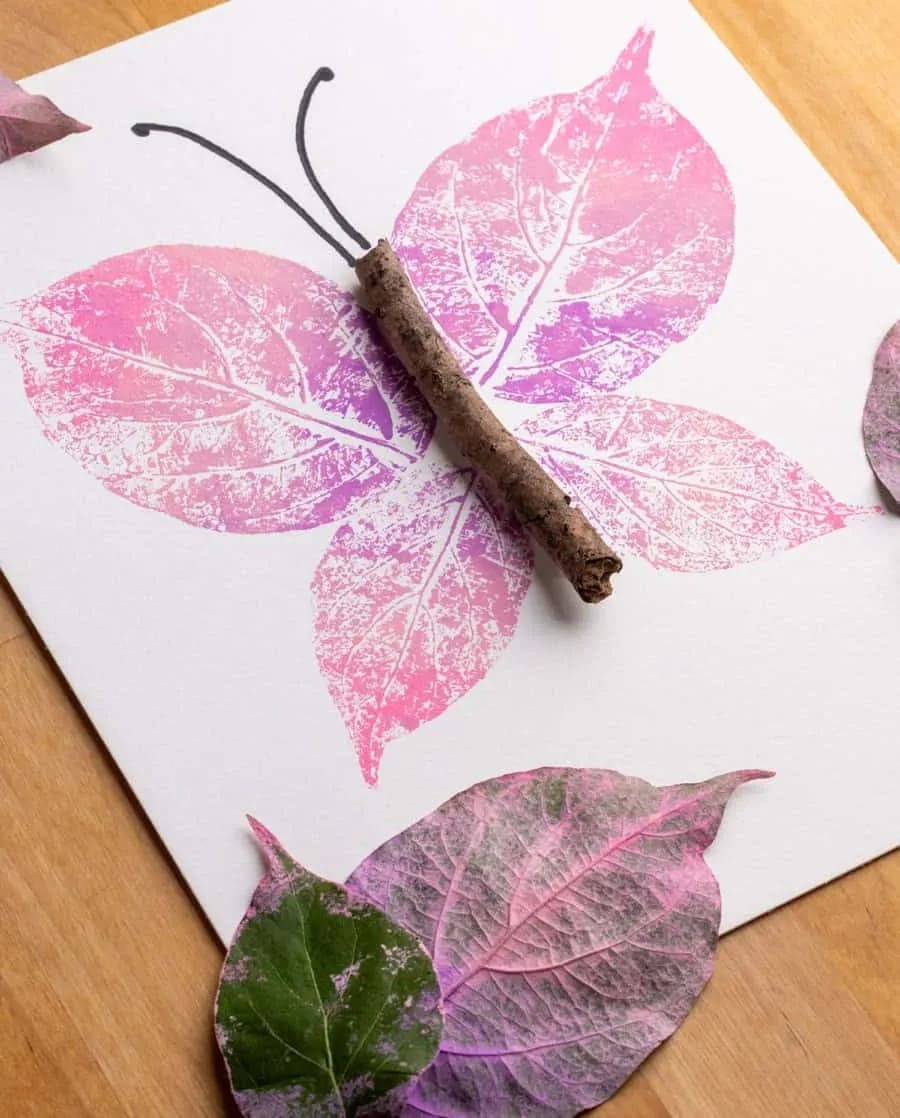
Nature and imagination come together in this soft, lovely butterfly craft. Using four real leaves dipped in pink and lavender hues, you can press out a symmetrical butterfly shape with subtle texture and vibrant color.
Also, the magic lies in the tiny details including a twig for the body and two delicate black lines for antennae. It’s simple, peaceful, and makes a beautiful addition to a spring-themed gallery wall or a calming corner in a child’s room.
Materials Needed
- 4 medium leaves (oval-shaped, approx. 4 inches long)
- Pink and purple acrylic paints
- White cardstock or canvas
- 1 small twig (4-5 inches)
- Black marker or pen
- Paintbrush and glue
Step-by-step Guide
Step 1: Paint the back side of each leaf with a mix of pink and purple, then press onto the paper in a mirrored butterfly shape.
Step 2: Allow the prints to dry, then glue a twig vertically in the center for the butterfly’s body.
Step 3: Use a black pen or marker to draw two simple antennae above the twig.
#11. Bold Leaf Prints on Recycled Cardboard
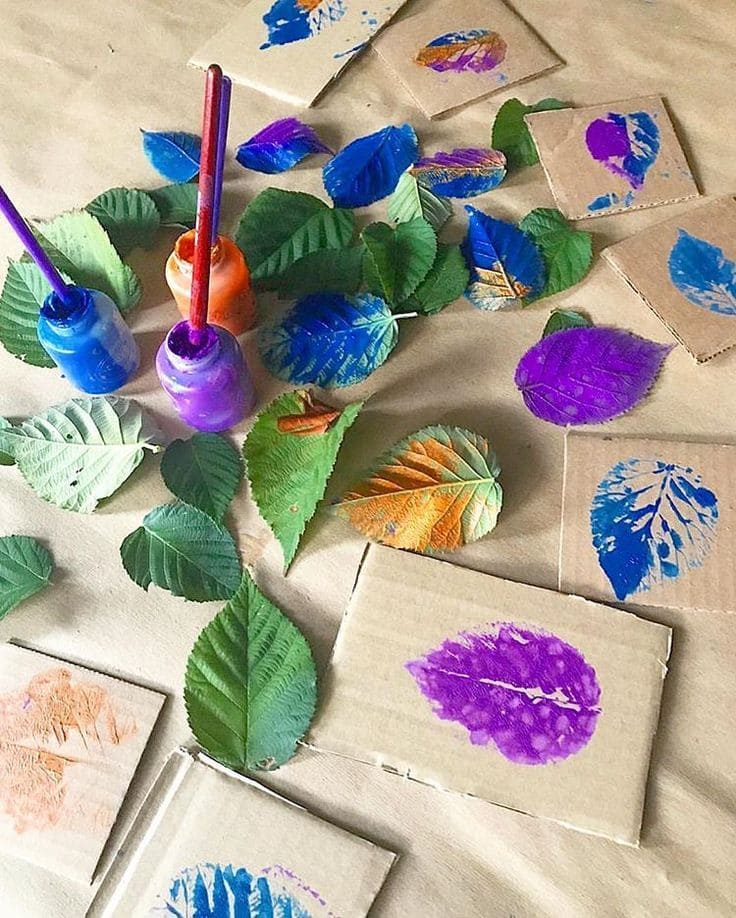
These vibrant leaf prints on cardboard turn simple materials into bold pieces of nature-inspired art. It’s a sensory-rich activity where every press reveals the veins and shapes of leaves in vivid purples, blues, and oranges.
By using leftover cardboard pieces, you’re not just creating something beautiful, you’re upcycling.
Materials Needed
- Recycled cardboard squares (4×4 inches or similar)
- Acrylic paint in bright colors
- 10-12 fresh leaves with prominent veins
- Paintbrushes
- Protective table cover or craft paper
Step-by-step Guide
Step 1: Paint the back side of each leaf with a thick layer of your chosen color.
Step 2: Press the leaf firmly onto a cardboard square and gently rub the surface. Then peel the leaf away to reveal the print and let it dry completely.
Step 3: Repeat with other colors and leaf shapes for a complete set.
#12. Colorful Leaf Printing with Oil Pastels
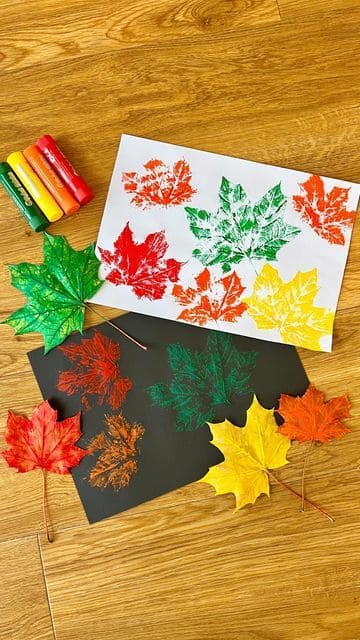
This vibrant leaf printing activity captures autumn’s fiery palette in the most hands-on way.
By coating real leaves in oil pastel or crayon, then pressing them onto paper, you’ll reveal crisp, beautiful veins and shapes, each print a mini celebration of nature’s design.
It’s simple enough for kids and therapeutic for adults, too. Plus, you can display them on white or black paper to create totally different vibes. The black background especially makes those colors pop!
Materials Needed
- Freshly fallen leaves (around 4–6 inches across)
- Oil pastels or jumbo crayons (red, orange, yellow, green)
- White and black cardstock (8.5″×11″)
- Paper towel or apron (optional, to avoid mess)
Step-by-step Guide
Step 1: Gather leaves with strong veins and place them vein-side up on a protected surface.
Step 2: Rub a generous layer of oil pastel over the leaf’s textured side. Then use bold autumn colors for variety.
Step 3: Carefully flip the leaf onto the paper and press it down evenly. You should smooth over with your hand to transfer the print.
Step 4: Gently lift the leaf off to reveal the colorful impression. You repeat with other colors and papers.
#13. Autumn Watercolor Leaf Illustration
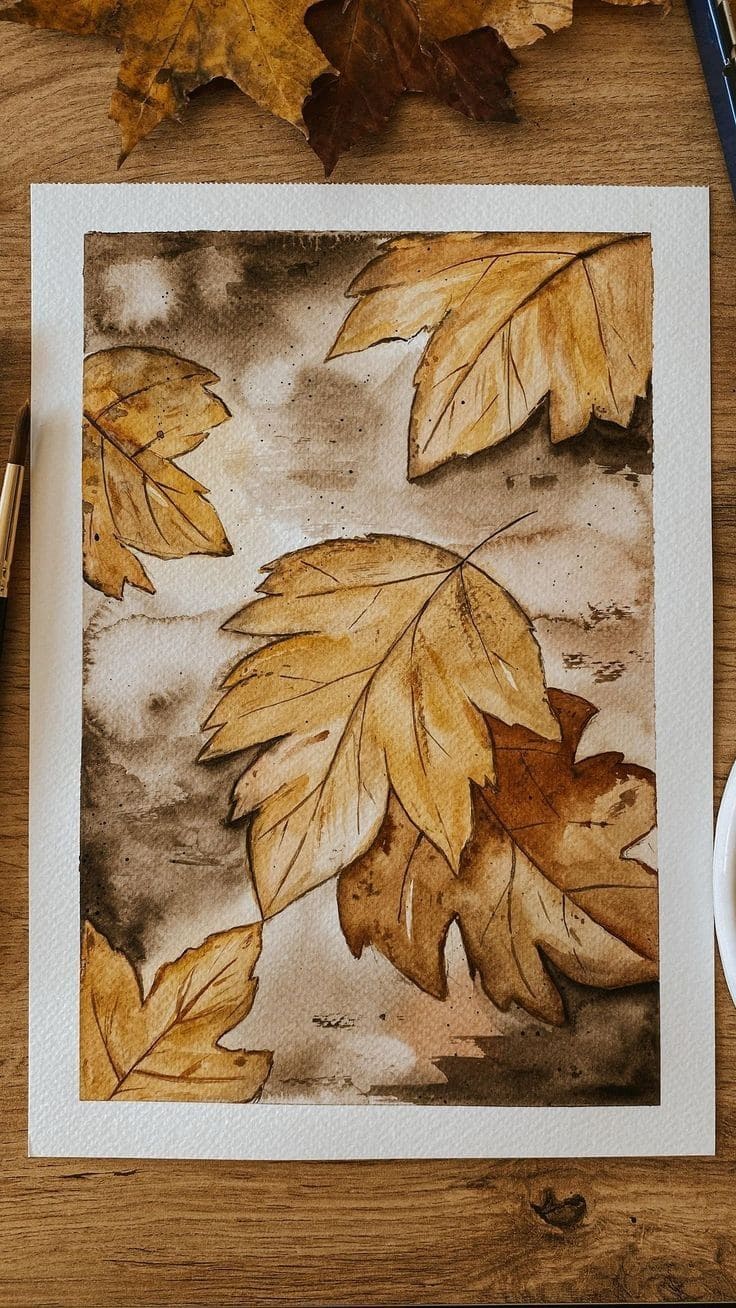
There’s something poetic about painting fallen leaves as their fleeting beauty frozen in time. This watercolor leaf print idea captures that earthy, golden stillness of autumn days.
With a mix of soft washes and detailed outlines, you can create a scene that feels like it drifted right out of a forest floor. You don’t need to be a seasoned artist, just observe, breathe, and let the brush mimic the rhythm of nature.
Materials Needed
- Cold-pressed watercolor paper (9″×12″)
- Watercolor paint set (with ochres, browns, and siennas)
- Round and fine-tip watercolor brushes (sizes 4 and 0)
- Pencil and eraser
- Real autumn leaves
- Water container and paper towel
Step-by-step Guide
Step 1: Lightly sketch a few overlapping leaves on your paper, inspired by real ones or your imagination. Don’t stress symmetry as imperfections are part of the charm.
Step 2: Using diluted washes of golden brown, fill in the leaves first. You need to work from light to dark, building up layers gradually as the paper dries.
Step 3: For the background, use a wet-on-wet technique with warm greys and soft taupes to create a moody contrast without overpowering the leaves.
Step 4: Once dry, outline the veins and edges using a fine brush and deeper brown tones to give each leaf a crisp, lifelike touch.
Step 5: Add a few shadows beneath the leaves to ground them, making your scene feel gently windswept and grounded in nature.
Tip: You can mix a bit of burnt sienna with ultramarine blue to create natural, muted shadows that don’t look harsh on the paper.
#14. Gold Leaf Relief Art on Canvas
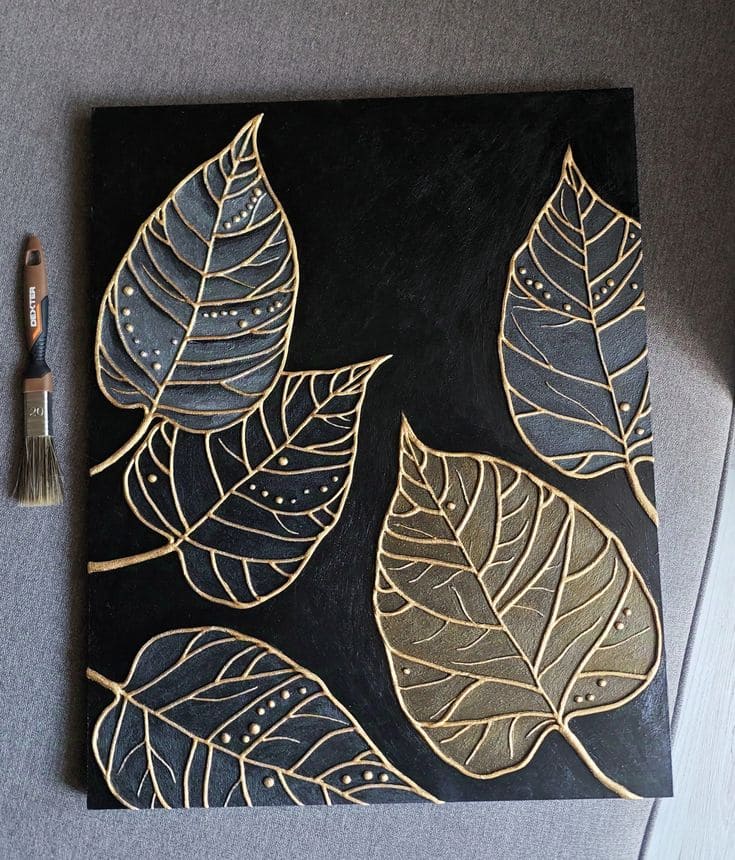
Wow, this dramatic and stylish canvas showcases bold leaf silhouettes raised with texture paste and outlined in gold, giving it a luxurious three-dimensional effect.
The leaves are carved with precision and highlighted using metallic paint that catches the light beautifully. It’s a statement piece for modern interiors and surprisingly easy to create with the right materials and a bit of patience.
Also, the matte black background sets off the shimmer, turning a simple leaf design into gallery-worthy decor.
Materials Needed
- Black canvas board (16″ x 20″)
- Texture paste or modeling paste (approx. 100 ml)
- Palette knife or precision nozzle applicator
- Gold acrylic paint
- Round-tip brush (#0-#2 size)
Step-by-step Guide
Step 1: Sketch out your leaf shapes lightly in pencil on the black canvas. Remember to keep spacing even for balance.
Step 2: Apply texture paste along the outlines using a nozzle or palette knife, creating raised ridges. Let it dry fully, around 4-6 hours.
Step 3: Once dry, paint over the raised lines with gold acrylic paint. You can also add small dots or embellishments to mimic natural leaf veins or raindrops.
#15. Leaf-Stamped Fish Art
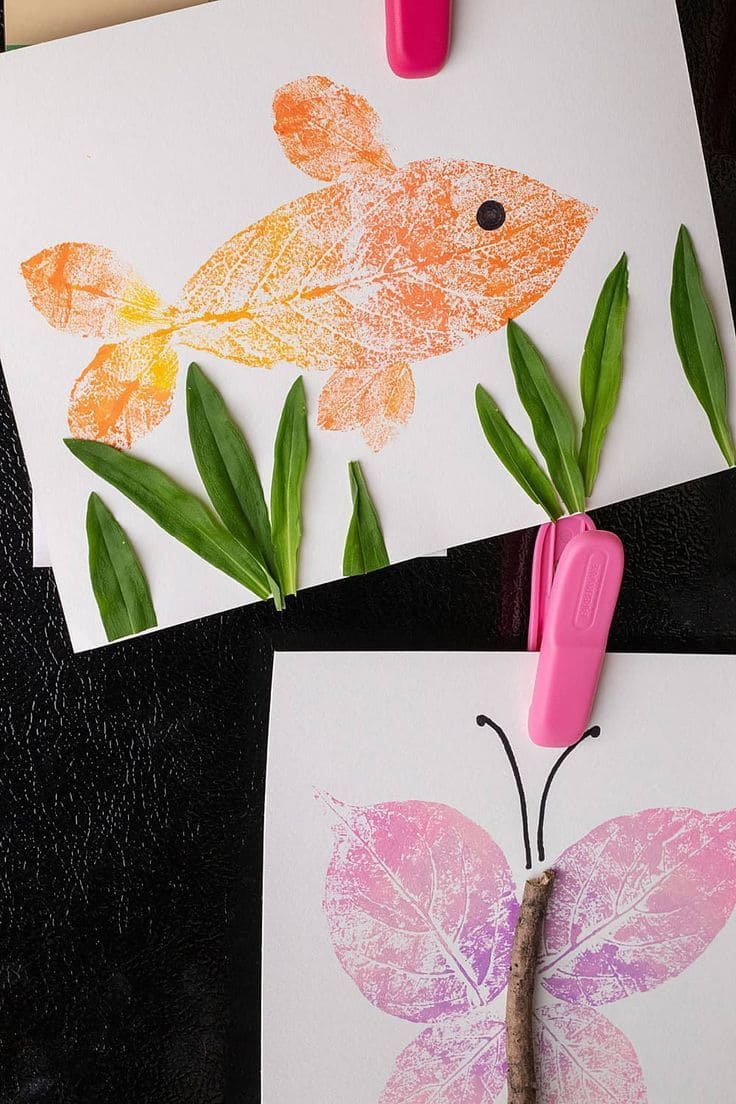
This vibrant fish is made entirely from leaf prints, and it’s surprisingly simple to create. With a little paint and a few natural textures, you can transform a single leaf into a playful underwater creature.
Bonus, the leafy patterns bring a soft, scaly effect that feels wonderfully organic. It’s perfect for kids or anyone who wants to add a splash of nature-inspired whimsy to their art collection.
Materials Needed
- 1 medium oval leaf (about 5” long)
- 2-3 smaller leaves (2-3” long) for fins and tail
- Orange and yellow paint or stamp pads
- White cardstock (8.5”×11”)
- Black marker
- Green leaves or grass blades (optional seaweed)
- Paintbrush
Step-by-step Guide
Step 1: Paint the textured side of the large leaf with orange and a hint of yellow, then press it gently onto the paper to create the fish body.
Step 2: Use the smaller leaves for fins and tail, then apply the same colors and stamp them in place around the body.
Step 3: Add a black dot for the eye, or draw one using a marker. You can keep it simple and expressive.
Step 4: Finish your aquatic scene by gluing grass or long leaves along the bottom as underwater plants.
#16. Framed Leaf Print Turkey Wall Art
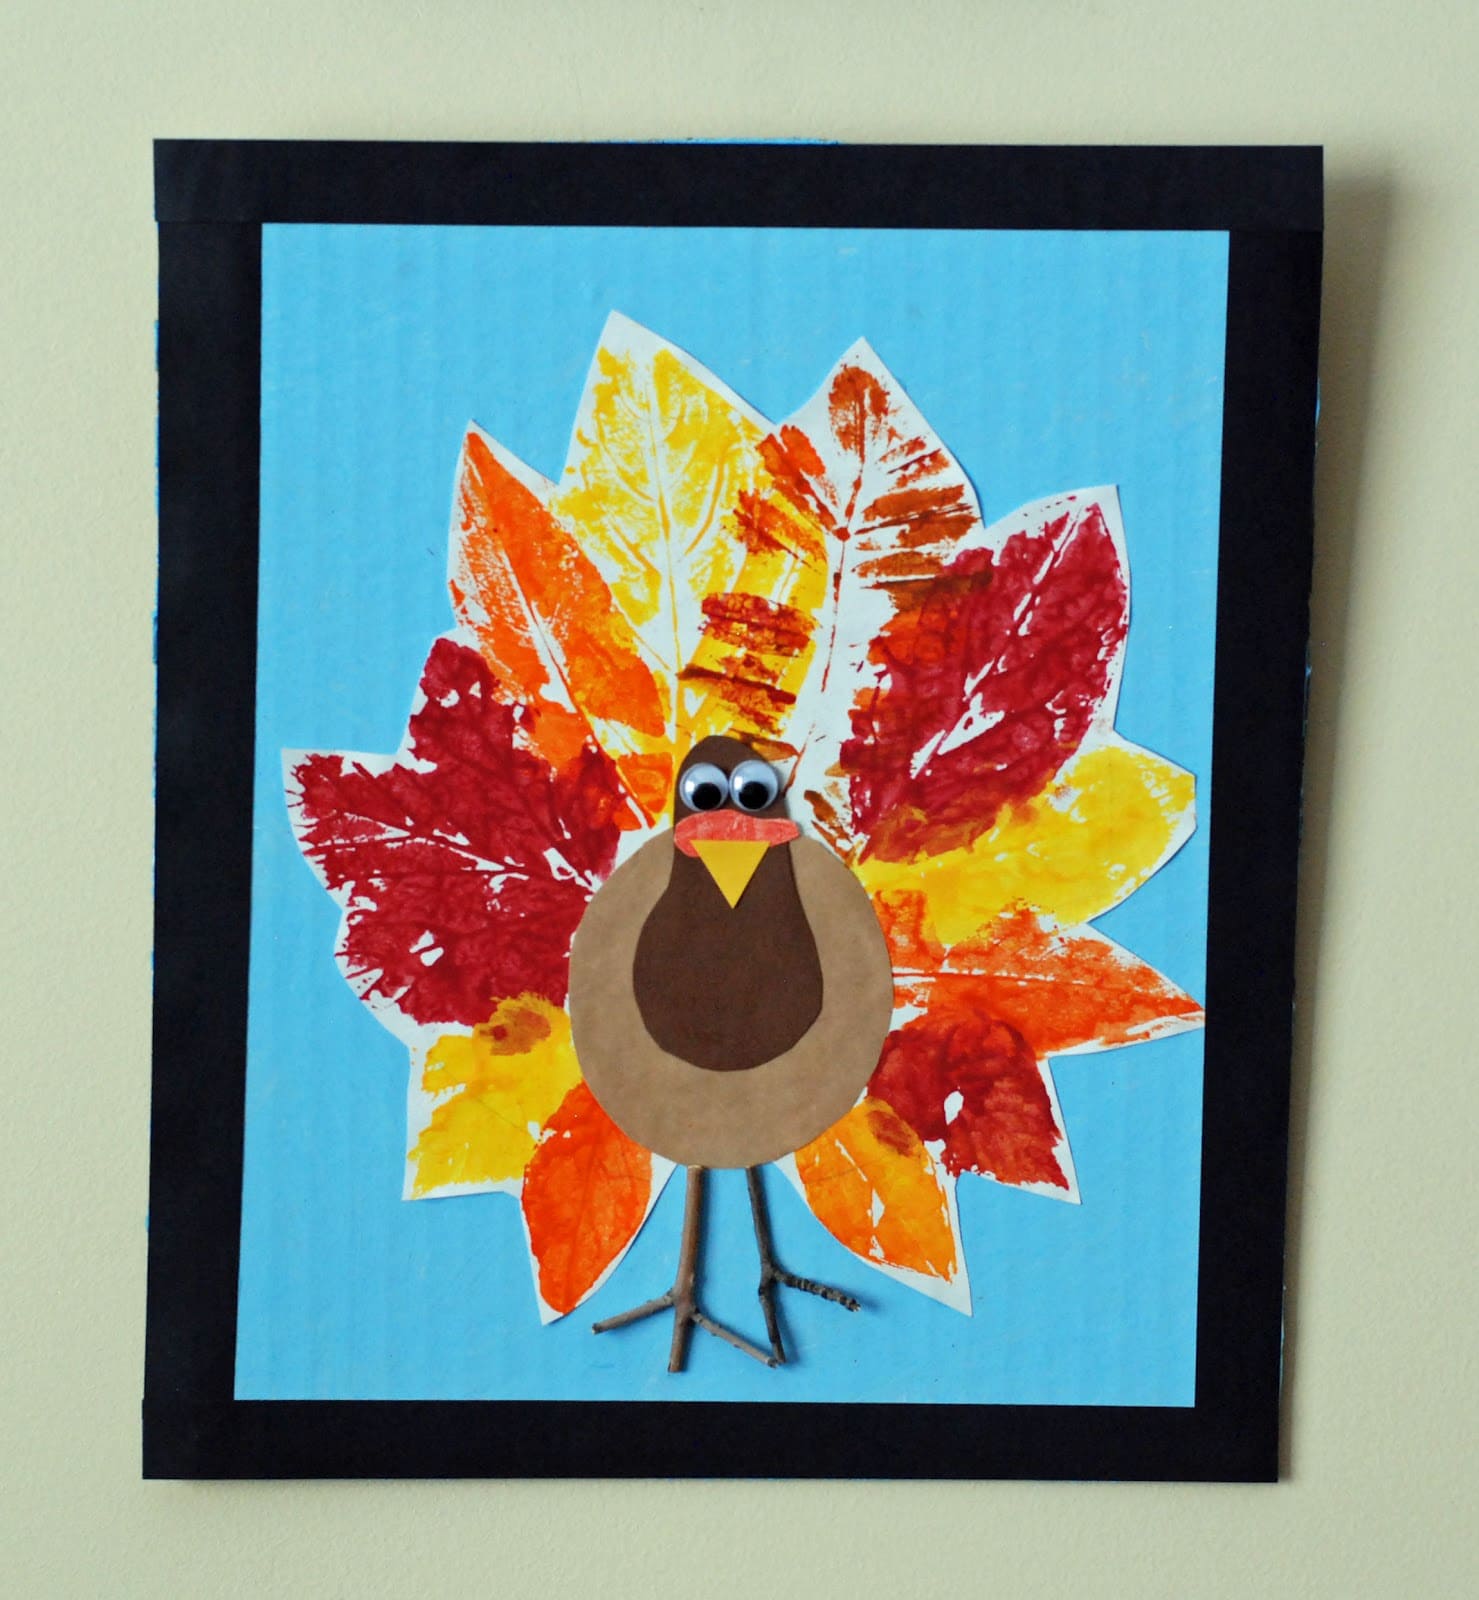
What about turning your child’s fall leaf prints into a charming keepsake with this framed turkey craft.?
Real leaves are painted and pressed to form a burst of feathery color, setting the stage for a playful paper turkey with googly eyes and twig legs. It’s equal parts nature and whimsy, perfect for hanging in the kitchen or gifting to grandparents.
Additionally, the bold black border turns it from a fun project into frame-worthy seasonal décor that celebrates both creativity and the beauty of fall foliage.
Materials Needed
- 6-8 real leaves (large size)
- Paints: red, yellow, orange, brown
- A4 blue cardstock for background
- Brown and orange construction paper
- 2 googly eyes (1 cm size)
- 2 small twigs (approx. 3-4 inches long)
- Black paper strips (2 cm wide, 4 pieces for border)
- Glue stick and scissors
Step-by-step Guide
Step 1: Paint the underside of each leaf in autumn colors and press them onto the blue cardstock in a fan shape.
Step 2: Cut out the turkey’s body, beak, and wattle from colored paper, and glue them over the printed leaves.
Step 3: Add googly eyes and twig legs to give your turkey character, then frame it with black paper strips for a polished look.
#17. Leaf Print Portrait Art
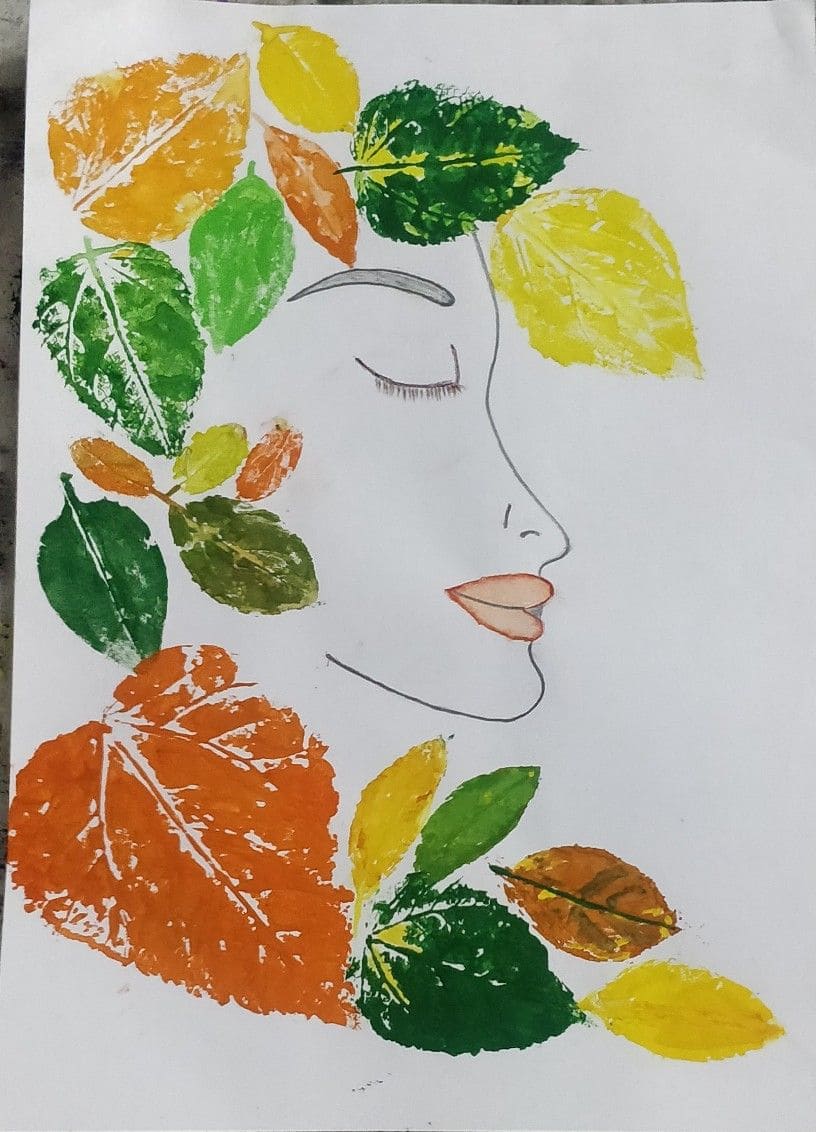
This artwork is a poetic fusion of nature and imagination. A simple outline of a woman’s profile becomes alive with vibrant leaf prints that form her flowing hair.
Also, each leaf dipped in autumnal shades of orange, green, yellow, and gold adds movement, mood, and texture. It’s more than just a print—it feels like a whisper of nature painted across paper.
Materials Needed
- White art paper (A4 or larger)
- Fresh leaves in a variety of shapes
- Acrylic or tempera paints in fall colors
- Paintbrushes and sponge dabbers
- Fine black marker or pencil
Step-by-step Guide
Step 1: Lightly sketch the outline of a face in profile using pencil or marker.
Step 2: Paint the back of each leaf and press it onto the page, arranging them to mimic flowing hair. You should alternate leaf shapes and colors for visual contrast and rhythm.
Step 3: Let the paint dry and touch up the face outline if needed for a cleaner look.
#18. Rainbow Fig Leaf Prints With Egg Carton Palette
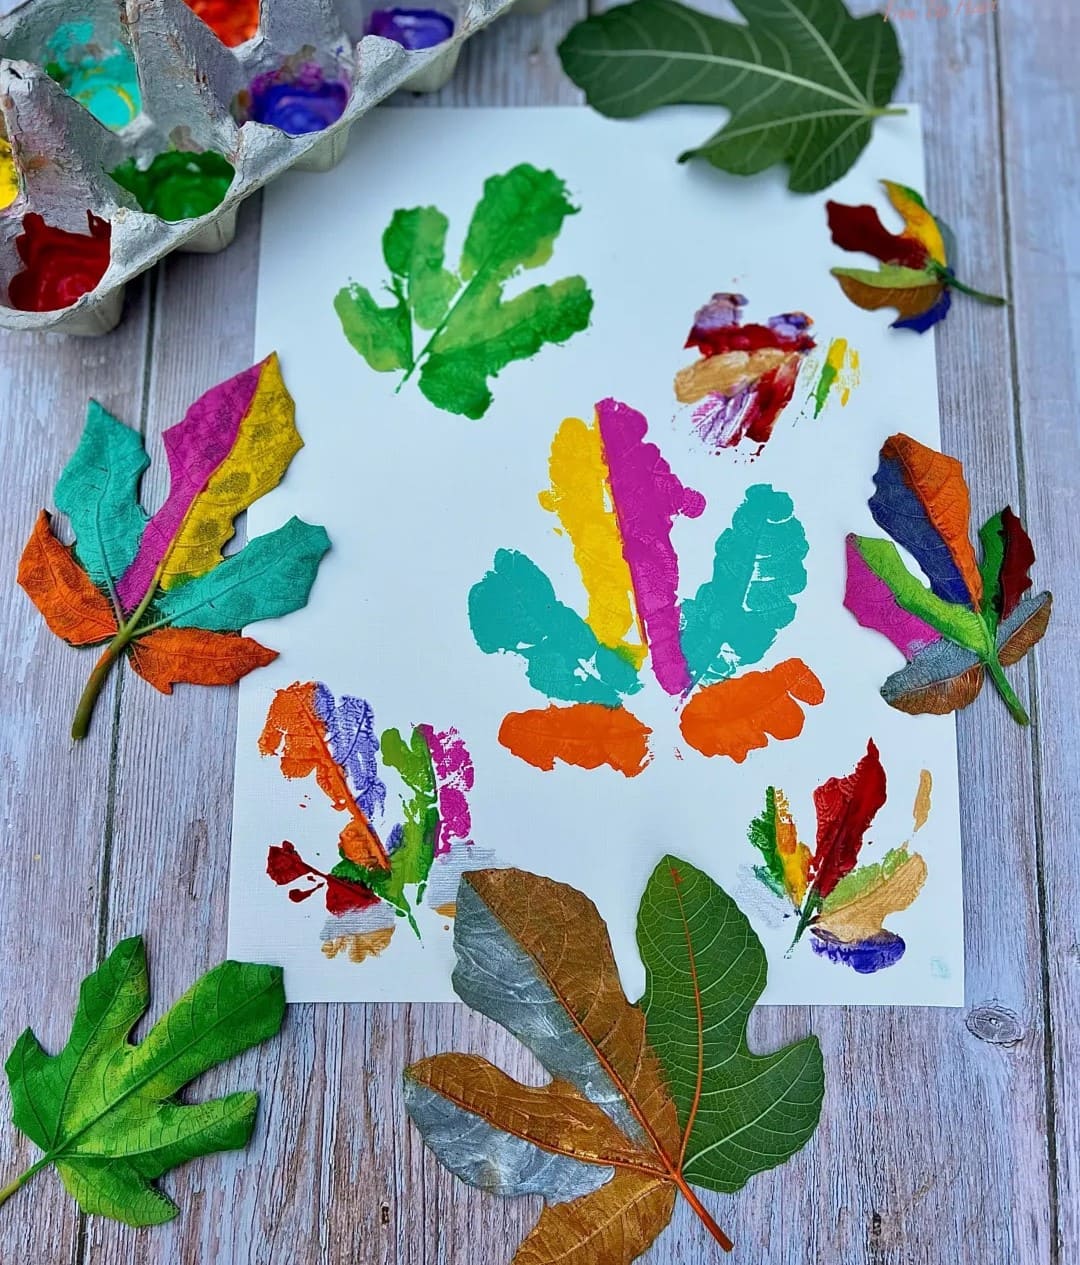
You can see this stunning activity turns humble fig leaves into radiant bursts of creativity. Each leaf becomes a bold stamp of multicolor joy, painted in vibrant hues that echo a rainbow palette.
Using an old egg carton as your paint tray makes it even more eco-conscious and fun for kids. The final prints are dynamic and full of texture, perfect for play-based learning, sensory exploration, or simply brightening a wall or window with nature’s shapes and color.
Materials Needed
- 6-8 fig leaves (5-6 inches wide)
- Acrylic paint in assorted rainbow colors
- 1 egg carton (for palette)
- Thick white paper or cardstock
- Paintbrushes (various sizes)
- Paper towels and a smock
Step-by-step Guide
Step 1: Pour paint into the egg carton compartments, separating colors to make blending easier for little hands.
Step 2: Paint each section of a fig leaf in a different color, then press it firmly onto the paper to create the print.
Step 3: Repeat with different leaf angles or combinations to form patterns, wings, or abstract rainbows.
Tip: Metallic paints or glitter glue can add a dazzling touch to your rainbow creations, great for seasonal displays or gifts.
#19. Autumn Leaf Prints in Salt Dough Keepsakes
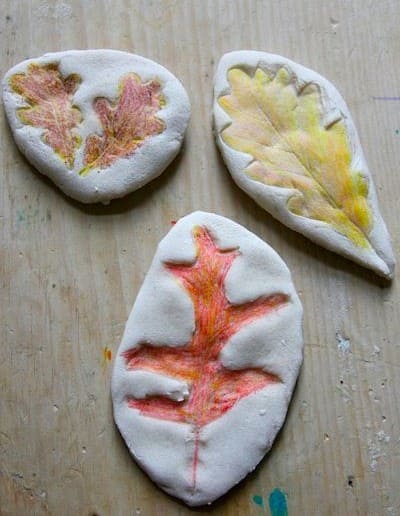
Using salt dough as your canvas, you can press real leaves into the surface to reveal beautiful, organic textures.
Once dry, these keepsakes can be colored with soft pencils or pastels to highlight each vein and edge. They make gorgeous natural decorations, gift tags, or seasonal paperweights, tiny time capsules of your autumn walk.
Materials Needed
- 1 cup flour
- ½ cup salt
- ½ cup water (adjust as needed)
- Assorted leaves (oak, maple, etc.)
- Rolling pin
- Watercolor pencils or soft pastels
- Baking tray and parchment paper
Step-by-step Guide
Step 1: Mix flour, salt, and water into a smooth dough. Then knead well and roll out to ½-inch thickness.
Step 2: Press a leaf firmly into the dough, then gently peel it away to reveal the imprint.
Step 3: Cut around the leaf shape, bake at 200°F (90°C) for 2-3 hours, and let cool completely.
Step 4: Lightly color the impressions using watercolor pencils or pastels to enhance the details.
#20. Leaf Print Tree Art for Seasonal Displays
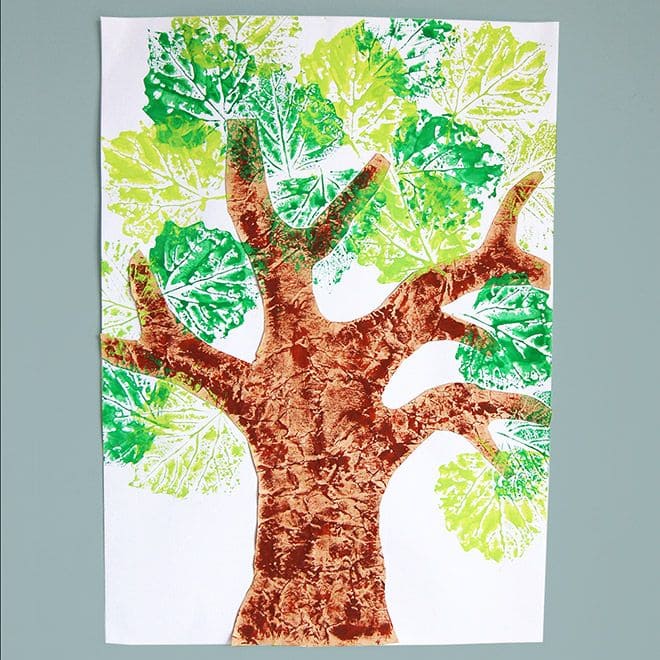
This leafy masterpiece is a beautiful way to celebrate nature and learn about the changing seasons. By using real leaves dipped in different shades of green and yellow paint, you can create a full, blooming canopy that bursts with texture.
Also, the tree trunk, painted in rich brown with textured brush strokes or crumpled paper, brings it all together. It is super ideal for classroom projects, seasonal bulletin boards, or a fun weekend art session at home.
Materials Needed
- White cardstock or canvas (A4 or larger)
- Brown, green, and yellow acrylic paints
- Paintbrushes or sponge pieces
- 5-7 assorted fresh leaves
- Paper plate or paint palette
Step-by-step Guide
Step 1: Use brown paint to draw and fill in a large tree trunk and branches on your paper. Then dab green and yellow paint onto the leaf’s underside using a sponge or brush.
Step 2: Press each leaf onto the top of the tree to form the foliage, using a variety of angles.
Step 3: Let it dry completely before displaying or framing.